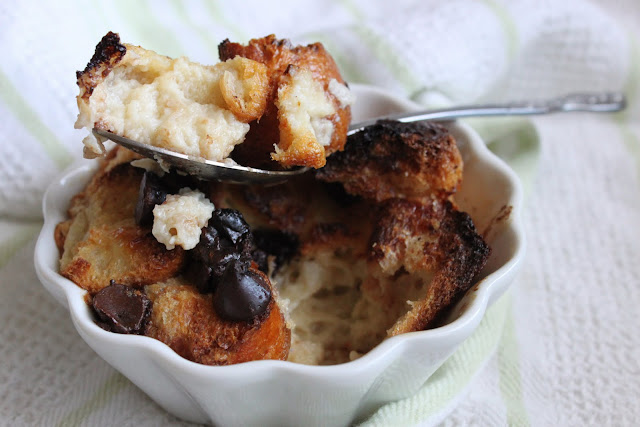
I had about a third of a loaf of French baguette that went stale while laying out on my kitchen counter for a couple of days. I had completely forgotten about it and before I knew it, it had gone completely stale. I don't like wasting so I perused my brain and decided it's about time I make some bread pudding. When I think of the words bread pudding, I think of my mother. She used to make a killer bread pudding out of croissants and marmalade when I was still under 5' tall. She didn't make it often so when she did, I would get so excited and eat so much of it that my stomach would beg for mercy. Bread pudding can be pretty heavy with all the heavy cream and whole milk involved, however, my mother's bread pudding even with all the butter from the croissants was light but with all the moistness of a heavy cream laden bread pudding. I don't have my mother's recipe so I attempted to recreate the fluffiness of her bread pudding. I must say, it was easy-peasy and turned out really well! It has the fluffiness and moisture throughout with a crispy top. Yum!!
Bread Pudding
1/3 of a French baguette, stale and broken up into pieces no larger than an 1"
6 tb chocolate chips
1 cup fat free milk
1 egg
1 tb brown sugar
Makes 3 servings.
- Preheat oven to 350F.
- Evenly distribute baguette pieces and chocolate chips between 3 ramekins.
- Combine milk, egg & brown sugar in a bowl and mix well.
- Pour mixture into ramekins and allow baguette pieces to soak in the milk mixture while the oven is preheating.
- Bake in oven for 30-40 minutes. The bread pudding is done if a toothpick inserted into the middle of a pudding comes out clean.
Friday, April 22, 2011
Hearty Chicken Soup For The Soul (Or Sickly)
I've been working on about week FOUR trying to recover from a cold of sorts that has managed to come back with a mean vengeance TWICE! I have been told to eat chicken soup to help my body battle this nasty virus that's gone around town and back. Apparently chicken soup is good for you when you're sick because it is comforting, hearty and nutritious. And I don't know about you but when I'm sick, I can always go for more liquids in my body. So here's my lovely version of chicken soup with rice!
Chicken Soup with Rice
2 tb olive oil
2 cups chicken breast, cubed
1 onion, chopped
2 or 3 cloves garlic, minced
5 cups chicken broth
3 cups water
1/4 cup celery, chopped
1/4 cup carrots, chopped (fresh or frozen)
1/4 peas (fresh or frozen)
1/4 sweet corn (fresh or frozen)
1/4 cup green beans, chopped (fresh or frozen)
1/4 bell pepper, chopped
2 stalks green onion, chopped
1 & 1/2 ts Italian seasoning
1/2 cup rice, uncooked
salt & freshly ground pepper to taste
- Combine olive oil, chicken, garlic, and onion in a pot and saute until chicken is done.
- Add remaining ingredients, stir and bring to a boil.
- Cover the pot, reduce the heat and simmer for about 30-40 minutes.
- Eat to your health's content!
Sunday, April 17, 2011
Æbleskiver (aka Danish Pancakes)
What is an Æbleskiver, you ask? Well, it's a type of pancake shaped like a ball. They are often hiding cheese, meats, jam, basically any food you want in their centers. These little guys are so light, fluffy and delicious! I'd eat these everyday if I could and I doubt I would ever tire of these since you can put anything in them and enjoy a different flavor every day. They're also very portable because they are easy to pack and eat without utensils - in other words, you'll see me eating these while driving in my car. The only downside of Æbleskivers are that you must have an Æbleskiver pan to make them. But do not fear, the pan has other uses as well. I like household items that are multi-functional because then I have less clutter and feel like I'm getting my bang for my buck. You can use this pan for making takoyaki or kuzhi paniyaram as well - I have not attempted the latter yet.
Æbleskiver
1 cup flour
1 tb granulated sugar
2 ts baking powder
1 cup lukewarm milk
2 eggs, yolks and whites separated
Frozen butter
Any filling or topping you want
- Combine flour, sugar and baking powder in a bowl.
- In another bowl, mix milk and egg yolks until well combined.
- Add flour mixture to the milk mixture bowl and stir until there are no lumps.
- In another bowl, beat egg whites until fluffy and stiff peaks form.
- Gently fold the egg whites into the batter.
- Heat your Æbleskiver pan on medium heat and place a tiny sliver of butter in each compartment.
- When the pan is thoroughly heated, place batter in each compartment such that each compartment is about 2/3 full. The batter will puff up and spill over if it is any more than 2/3 full.
- Cook for about 2 minutes and take a skewer or knitting needle (if you want to go all out and be traditional) and carefully slide the cooked half 90 degrees and slip whatever little surprise you want to put in the middle. Then slide the cooked half another 180 degrees so that it is on top to allow the rest of the batter to sink into the compartment to form the ball shape.
- Cook for another 2 minutes or so until the center comes out clean when poked with a toothpick.
- Use the toothpick, skewer or knitting needle to gently remove the yummy Æbleskivers and serve with jam, syrup, powdered sugar, or naked.
Friday, April 15, 2011
Hanging Out With The Fungis
I haven't hung out with enough fun guys lately so I thought I'd have a lunch date with some fungis. PCC (Puget Consumers Cooperative) had these fairly large crimini mushrooms that were the perfect size for stuffed mushrooms. For those who are wondering what PCC is, it is a community owned natural food co-operative store in the Seattle area. It's a nice grocery store because all the edibles are natural, organic and local (as much as possible). It's nice to shop here to get fresh local produce when the farmers markets are closed during part of autumn, all of winter winter, and part of spring. For those who live in the Seattle area, I highly recommend you check out a PCC near you.
Now back to my awesome time with the mushrooms. I stuffed these little babies with couscous and used the leftover couscous to make a fried rice of sorts but without the rice. Turned out quite tasty and I definitely had fun making and gobbling up these healthy fungis. MmmmmM!
Couscous Stuffed Mushrooms with "Fried" Couscous
Makes about 2 servings.
1 cup chicken stock
1/2 cup couscous
4 large mushrooms
1/3 lb baby asparagus, chopped into about 1/4" pieces
1/2 onion, finely chopped
1/2 lb small tomatoes, such as grape
Grated Parmesan cheese
Salt & Pepper to taste
Extra virgin olive oil
- Preheat oven to 400F.
- Sprinkle olive oil over tomatoes and roast in the oven for 15-20 minutes.
- In the meantime, remove stems from mushrooms and chop stems into 1/8" pieces or so. In other words, very small pieces.
- Add mushroom stems to chicken stock & 1 tb olive oil and bring to a boil.
- Turn heat off, add couscous and cover pot for about five minutes.
- Stuff mushrooms with couscous mixture and lightly sprinkle with Parmesan cheese and olive oil.
- Place stuffed mushrooms in oven for 15-20 minutes.
- Place remaining couscous mixture in a separate bowl.
- Using the same pot, cook onions until they are translucent.
- While onions are cooking, place asparagus in a bowl with about 2-3 tb water and microwave for 2-3 minutes until tender.
- When tomatoes are done, let them rest for about 2 minutes and then toss the onions, asparagus, and tomatoes with the couscous mixture.
- Add salt & pepper to taste.
- Serve "fried" couscous with stuffed mushrooms and have some fun!
Thursday, April 7, 2011
Rose Pistachio Cookies
What do you think of when you see the word "Spring"? How about flowers? That's what I think of. I love spring because it's a sign that the trees and plants are waking up and bringing color back in and sweeping out the grey winters. One of the splashes of spring colors I absolutely love are those from Ranunculus flowers and you'll know spring is here when you see them in the floral section.
Aren't they just absolutely beautiful?
In the spirit of flowers, I decided it would be fun to make some edibles with floral notes in it - and that's where rose pistachio cookies come in! Like spring season, the cookies are light and floral but with a hint of citrus from the limes.
Rose Pistachio Cookies
1/2 cup canola oil
3 tb milk
1 & 1/2 tb rosewater
2 ts vanilla extract
2 limes, zested & juiced
3/4 cup sugar
1/4 cup cornstarch
1 & 1/2 cup wheat flour
1 ts baking powder
1/2 ts salt
1/4 ts ground cardamom
1/2 cup shelled pistachios, coarsely chopped
Makes about 2 dozen cookies.
- Preheat oven to 350F.
- Mix canola oil, milk, rosewater, vanilla extract, & lime zest & juice in a large bowl.
- Add sugar and mix well.
- Add remaining ingredients and mix well.
- Take about 1 & 1/2 tb of the dough, roll into a ball and place onto baking sheet about 2" apart from one another.
- Bake for 12-15 minutes and let cookies cool completely on a cookie rack.
Subscribe to:
Posts (Atom)